Pelican’s Authorization System
At its core, the goal of Pelican’s authorization system is simple: give the right people access to the right data, and protect the data from everyone else. Whether data is private, public, or shared with a specific collaboration, Pelican ensures that only authorized users can access it. To achieve this in a distributed environment without sacrificing performance, Pelican relies on a modern, token-based architecture that separates the responsibility of verifying identity from the responsibility of granting access.
Authentication vs Authorization (AuthZ vs AuthN)
While often used interchangeably in casual conversation, Authentication and Authorization (often abbreviated AuthN and AuthZ) are distinct concepts in computer security.
- Authentication (AuthN) is the process of verifying who you are. It’s used to confirm your identity and typically involves providing some kind of secret or unique thing that only you possess. Common authentication methods include passwords, certificates, or federated identity providers like CILogon .
- Showing your passport to airport security proves you are the person named on your ticket — only you possess the face shown in the passport.
- In Computing: Logging in with a username and password, or using multi-factor authentication — only you possess the password and phone number associated with the account.
- Authorization (Authz) answers the question what you are allowed to do. It determines your permissions and is typically managed through policies, roles, or access tokens.
- Your boarding pass allows you to board a specific flight and sit in a specific seat, but it doesn’t let you sit in someone else’s seat, fly the plane or enter the cockpit.
- In Computing: Having read-only access to a file, or administrative privileges on a server.
Part of what makes these concepts confusing is that in order to determine what you’re allowed to do, we usually first have to determine who you are; before granting authorization, you have to be authenticated.
This is true, but Pelican draws a clear line between the two by leaving it up to external identity providers to handle the “who” (Authentication), while Pelican focuses exclusively on the “what” (Authorization). Pelican does not manage usernames, passwords, or user accounts. Instead, it relies on the OpenID Connect (OIDC) standard to integrate with trusted third-party identity providers like CILogon, university logins, or Google.
The Challenge of Federated Identity
In a distributed environment like the OSDF, Federated Authentication is notoriously difficult. It requires that every service in the federation trusts and understands the identity providers of every user. If a user from University A wants to access data at Laboratory B, Laboratory B must be able to verify University A’s credentials directly. Scaling this “mesh of trust” across hundreds of institutions is complex and fragile.
Pelican addresses this by relying on Federated Authorization. Instead of passing user identities around, we pass tokens with capabilities. When a user authenticates with their home institution, that institution’s identity provider gives information about who the user is to an authorization server. The authorization server then decides what the user is allowed to do and creates a token explaining those permissions. Importantly, this token doesn’t say “This is User X”; it says “The bearer of this token is allowed to read /data/project-y”.
The services in the federation (Origins and Caches) do not need to know who the user is; they only need to trust the authorization server identified by the iss claim in the token and verify that the token grants the necessary permissions.
This decouples the identity verification from resource access, allowing Pelican to protect data without ever needing to store or manage sensitive user credentials.
Tokens
In the context of Pelican and modern web security, an Authorization Token is a portable, digital credential that grants access to specific resources. While tokens can be used for authentication, Pelican uses them exclusively for authorization to specify what the token holder is allowed to do.
Sometimes these tokens are also referred to as Bearer Tokens because we don’t make any assertions about who is presenting the tokens, only about what the token says the bearer/presenter is allowed to do. This is a sure sign that we’re working with an authorization framework, not an authentication framework.
Since there is a distinction between authentication tokens and authorization tokens, whenever these docs refer simply to “tokens”, we’re talking about “authorization” tokens.
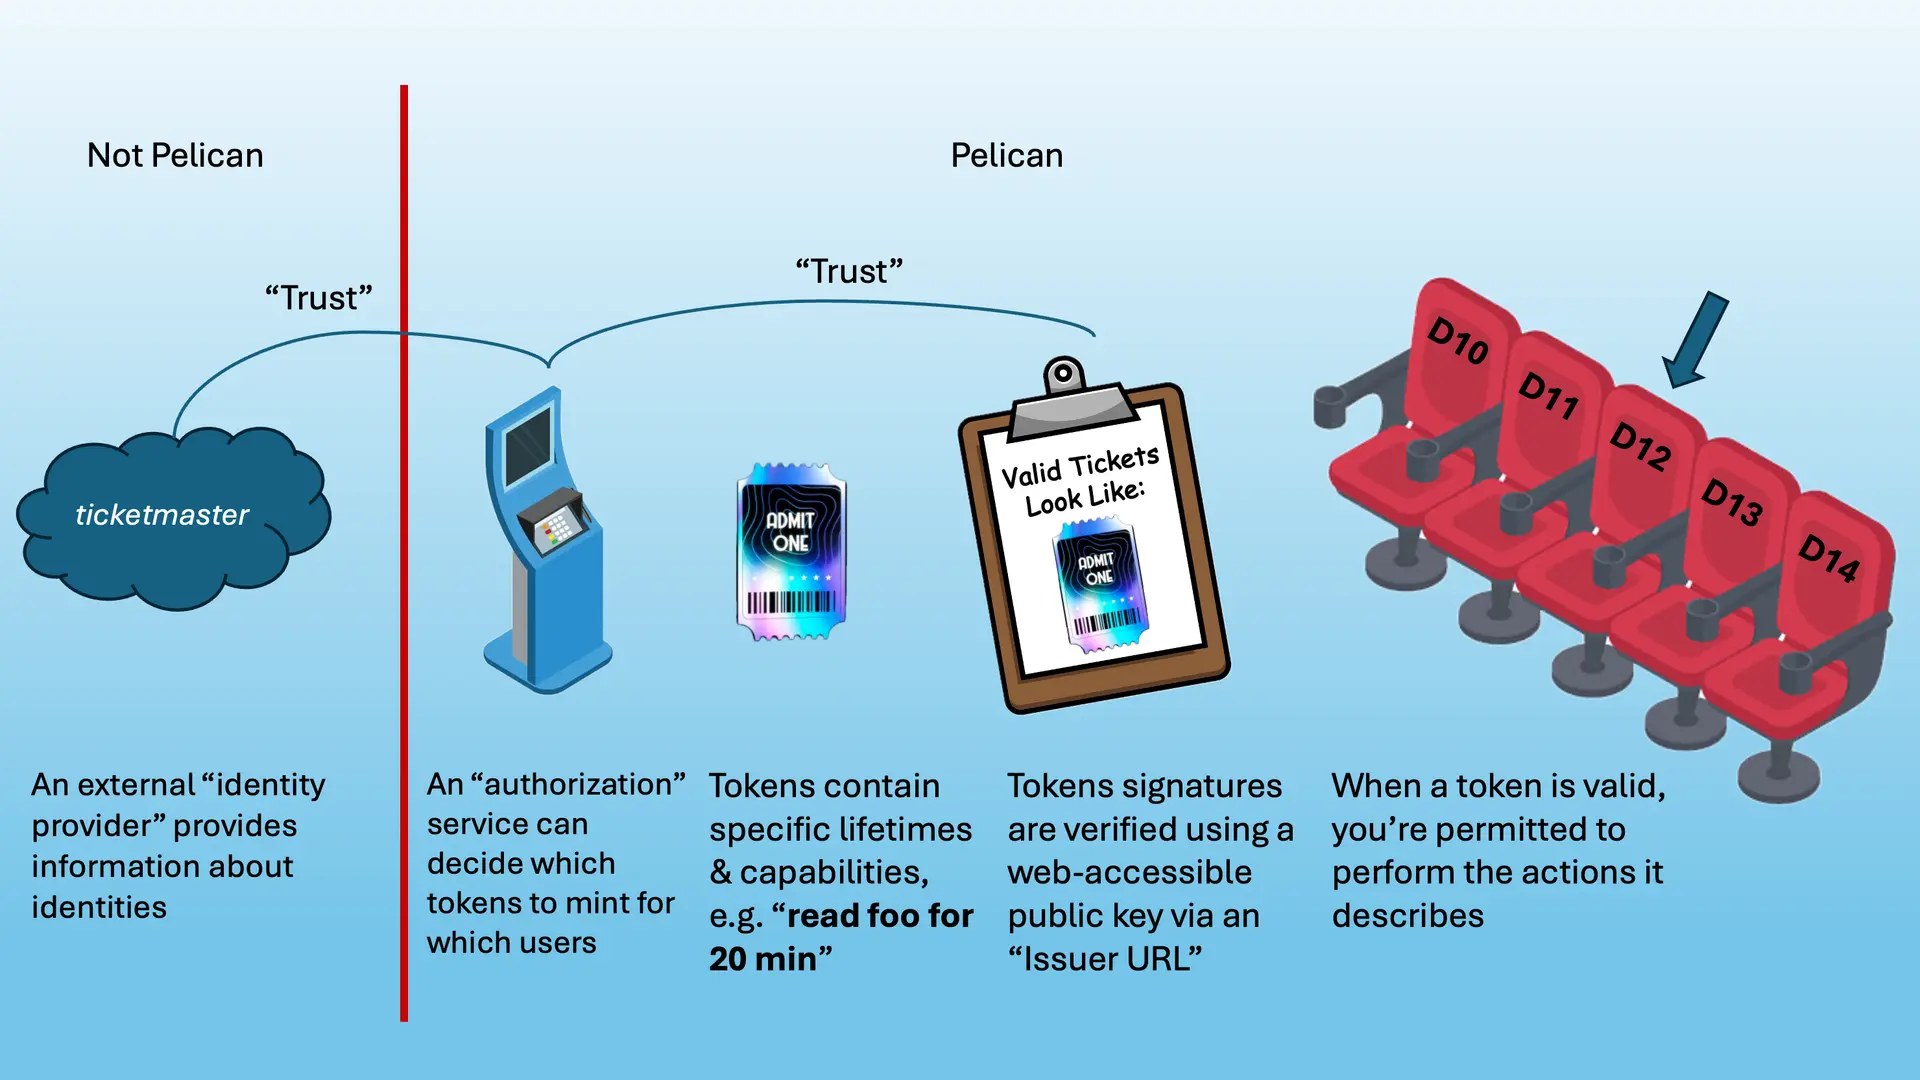
A good analogy to understand how tokens work is to think of them like concert tickets:
Concert Tickets
Tokens
1. You go to the ticket booth and prove you’re the one who paid
1. You go to an identity provider and log into your account to prove who you are
2. The receptionist at the ticket booth double checks which seat you paid for and then prints/issues you a ticket that says “whoever holds this ticket can enter the venue today between 7-8pm and is allowed to sit in seat D12”. The ticket has a special hologram on it that only this printer can create
2. The identity provider hands various identifiers to an authorization server that uses those identifiers—combined with its own policy—to decide what you’re allowed to do.
It then creates a token that says “whoever presents this token is allowed to read and write anywhere under the /foo namespace for the next 20 minutes”.
The token is cryptographically signed with a private key belonging to the authorization server (or a service it has delegated signing to)
3. At 7pm, you present the ticket to a security guard who compares its hologram against an example on his clipboard. The guard confirms the hologram is authentic because he trusts that whoever handed him the clipboard works for the same company.
3. Within the 20m timeframe, you present the token to an Origin along with a request to download an object called /foo/picture.jpg.
The Origin fetches the issuer’s public key (from online or a local cache) and verifies the token’s signature is authentic because it trusts that the issuer is allowed to speak on behalf of the requested resources
4. You enter the venue and are escorted by an usher to your seat
4. Finally, the Origin let’s you proceed with the download
Importantly, if you tried to use a ticket for a different band or you scribbled all over the token (tampered with it), you’d be denied entry by the security guard. These same principles apply to tokens, which is why they work well for guarding protected resources. While tokens cannot be revoked the way certificates can be, their short lifetimes minimize the potential for leaking data by building in an automatic expiration.
Ultimately, the security guarantees of tokens come from public/private key cryptography, which lets the authorization server sign tokens using a private key while the corresponding public key is openly available for anyone to verify the signature on the token. In practice, the service that signs the token and the service that hosts the public keys for verification are often split. For more information about this, see the section on “Issuers”.
JSON Web Tokens (JWTs)
So far we’ve discussed what role tokens play and how they work at a high level, but we haven’t yet discussed what a real token looks like.
Pelican uses a specific type of token called a JSON Web Token (JWT). A JWT is an open standard (RFC 7519) that defines a compact and self-contained way for securely transmitting information between parties as a JSON object.
JWTs consist of three parts:
- Header: Describes how the token was signed (e.g., “We used the RS256 algorithm”).
- Payload: Contains the “Claims” — the actual data/permissions. This includes:
iss(Issuer): An identifier (URL) for the authorization server that issued this tokenaud(Audience): Who do we expect this token to be presented to?exp(Expiration): When does this token expire?iat(Issued At): When was this token created?nbf(Not Before): When does the lifetime of this token start?scope(Scope): Which actions can be performed on which resources, i.e. what is this token allowed to do?jti(JWT Identifier): A unique identifier that is specific to this token.- Other fields can be defined according to specific token profiles (see “Token Profiles” for more information)
- Signature: The cryptographic proof that ensures the token was created by the right issuer and hasn’t been altered. Signatures do not decode to JSON
Below are JSON objects that represent an example JWT header and payload:
{
  "alg": "RS256",
  "kid": "key-rs256",
  "typ": "JWT"
}
{
  "aud": "https://demo.scitokens.org",
  "iss": "https://demo.scitokens.org",
  "exp": 1764179999,
  "iat": 1764179399,
  "nbf": 1764179399,
  "jti": "f84a5cb6-8e1b-46b4-a205-0c44503a3d27",
  "scope": "read:/foo",
  "ver": "scitoken:2.0"
}
In order to pass these tokens around, each part of the token is base64-encoded and strung together using periods (.), i.e. Header.Payload.Signature.
The previous token JSON (along with a made up signature) would be encoded as:
eyJhbGciOiJSUzI1NiIsImtpZCI6ImtleS1yczI1NiIsInR5cCI6IkpXVCJ9.eyJhdWQiOiJodHRwczovL2RlbW8uc2NpdG9rZW5zLm9yZyIsImlzcyI6Imh0dHBzOi8vZGVtby5zY2l0b2tlbnMub3JnIiwiZXhwIjoxNzY0MTgwNjI2LCJpYXQiOjE3NjQxODAwMjYsIm5iZiI6MTc2NDE4MDAyNiwianRpIjoiZjg0YTVjYjYtOGUxYi00NmI0LWEyMDUtMGM0NDUwM2EzZDI3Iiwic2NvcGUiOiJyZWFkOi9mb28iLCJ2ZXIiOiJzY2l0b2tlbjoyLjAifQ.RmtEjRW63s2v2HuhulWhB0FHltza9eyUVDKhYs-jGHQYsEL65gIMMHb6IbB1BL9YBzdMCJd4J8n8sPt8rN5YJxC8SJ1nQHjzJOBDXZhhQ52W5Rj5KQQINwISuU6QA39RMZ3hOWexijW9OEcmvCZLpDPqRCyc7xAcW3DgCzWqiopgS3ff-Cj9AR8RFa90V5VEfXYwvyVsmE4sUy3FqrDpyG4OuNkVIpuuF7l7XlqnSC4b2QFFmlbkxw6B4q3s2_mHPIcCMIhwo8mCNuXVaeSCIh6EtJ7eALQpbagWvdqFhL6dGRNFsHPDgfas98nkRfRv4gVP5_Qj7qVcUSp_1std5QYou should be extremely careful about sharing token signatures; treat this like sharing a password!
You can safely share the first two sections (everything up to but not after the second period) of your tokens because they don’t contain secrets.
Encoded vs. Encrypted It is crucial to understand that the Header and Payload of a JWT are merely Base64Url encoded, not encrypted. This means anyone who intercepts the token can read the information inside it (like the namespace paths you are accessing).
However, they cannot change that information. Changing the payload would invalidate the Signature, causing the token to be rejected by Pelican.
JWT Tools
If you’re working with JWTs, it’s useful to know about a few tools that help you decode them for interpreting what they say.
Both the SciTokens demo site and jwt.io are great web-based portals for converting tokens to/from their encoded and decoded forms. In particular, jwt.io is nice because you can hover your mouse over the token’s timestamps to see them in human-readable form. Both websites operate purely in your browser, so any tokens you input won’t be sent anywhere — this lets you use the sites without worrying about anyone stealing your secrets!
In general, most of the JWTs you’ll need to create to work with Pelican can be created using Pelican’s command line token tools.
However, other command line libraries like the ones provided at https://demo.scitokens.org/ and the htgettoken tool can be used to create/decode generic JWTs.
Token Profiles
JWT is a generic framework for packing information into a string that’s easy to pass between web services.
While some of the core JSON keys like iss, exp, etc. are present in every JWT, some people have extended the keys/semantics of JWTs to communicate specific information relevant in their ecosystems.
Specifications that describe the extra contents of a JWT are called profiles, and they typically describe which “scopes” are recognized and which other fields are mandatory.
The two profiles used in the Pelican ecosystem are the WLCG Profile and the SciTokens profile.
WLCG Profile
The Worldwide LHC Computing Grid (WLCG) auth group maintains the WLCG token profile. Some of the WLCG scopes/capabilities Pelican uses include:
storage.read:/path/to/resource: grants the ability to read the specified resourcestorage.create:/path/to/resource: grants the ability to create but not modify the specified resourcestorage.modify:/path/to/resource: a superset ofstorage.create, grants the ability to modify and delete the specified resource
See WLCG’s Token Profile documentation for more information about other WLCG token requirements and available capabilities/scopes.
SciTokens Profile
The SciTokens Profile is another option Pelican understands how to work with, although Pelican prefers the WLCG profile. Some of the SciTokens scopes/capabilities Pelican uses include:
read:/path/to/resource: grants the ability to read the specified resourcewrite:/path/to/resource: grants the ability to create/modify the specified resource
See the SciTokens site for generic documentation and the SciTokens Claims specification for more information about other SciTokens requirements and available capabilities/scopes.
Be careful using tokens that let you modify object contents after the object has been written — Pelican objects should be treated as immutable, so these tokens can get you in trouble!
Issuers
In the Pelican and OAuth2 ecosystems, people often refer to issuers, and it can be difficult to separate the concept of issuers from authorization servers. Put simply, the term “issuer” refers to an identifier (i.e. a URL) for an authorization server that is used to indicate where the authorization server’s public keys can be obtained. It is important to understand that an issuer is just a string: it doesn’t perform actions, make decisions, or create tokens on its own.
The entity that actually does things is the authorization server.
It is the service responsible for creating and cryptographically signing tokens.
When an Origin or Cache receives a token, it reads the iss claim as a key to look up the corresponding authorization server’s public keys and verify the token’s signature.
Depending on what the authorization server advertises in its metadata, Pelican may also be able to use it to obtain tokens (via standard OAuth2 flows) on behalf of a user.
OIDC Metadata Discovery
The issuer URL serves as a lookup key for finding public keys — it is not necessarily the address of the service that signed the token. The signing may have been done by a completely different service (see Delegated Signing below); the issuer URL is simply where consumers go to discover the keys needed to verify that signature.
Because Pelican follows the OpenID Connect (OIDC) specification, those public keys can be found by:
- Appending
/.well-known/openid-configurationto the issuer URL and fetching the JSON at that address. For example, for the issuerhttps://osg-htc.org, fetchhttps://osg-htc.org/.well-known/openid-configuration. - Parsing the resulting metadata document for a
"jwks_uri"key. Its value is a URL pointing to a JSON Web Key Set (JWKS) containing the public keys trusted for this issuer. - Fetching those keys and using them to verify that a given token’s signature is authentic.
If the metadata document also contains a "token_endpoint", Pelican can use it to request tokens via an OAuth2 flow.
How Authorization Servers Sign Tokens
There are two common patterns for how an authorization server handles signing:
-
Co-located signing: The signing service runs at (or is proxied through) the issuer URL, so OIDC discovery on the issuer URL directly returns the signing keys. This is how Pelican’s built-in authorization works: OA4MP (OAuth for Many People) performs the signing, but because it is embedded within and proxied through the Pelican Origin process, the
issclaim is simply set to the Pelican Origin’s own URL (e.g.https://my-origin.com:8443). Token consumers run OIDC discovery on that URL and find the keys without any indirection. -
Decoupled issuer identity: The signing service runs at a different address than the
issURL. Theissclaim is set to some other URL — for example, a lab or project URL — and the party controlling that URL is responsible for publishing the signer’s public keys there via OIDC discovery. Token consumers look up keys at theissURL without needing to know where the signing actually occurred or which service performed it. Services such as HTCondor’s CredMon commonly use this pattern.
The Origin must be configured to trust an authorization server for each exported namespace by providing the issuer URL — the URL where OIDC key discovery will be performed, which in the decoupled case may be entirely different from the address of the service that performed the signing.
Issuers are not Identity Providers. An identity provider handles authentication, i.e. verifying who a user is. It then passes identifiers (like group membership) to an authorization server, which handles authorization: deciding what the user is allowed to do and, if appropriate, creating a signed token. The token an authorization server creates is the intersection of what it is configured to grant and what the user has requested.
Trust Relationships
At the end of the day, the user provides a token to an Origin or Cache along with a request to perform an action on a resource (read /foo).
But it’s the Origin/Cache that has to decide whether it will fulfill the request and let the user do what it wants.
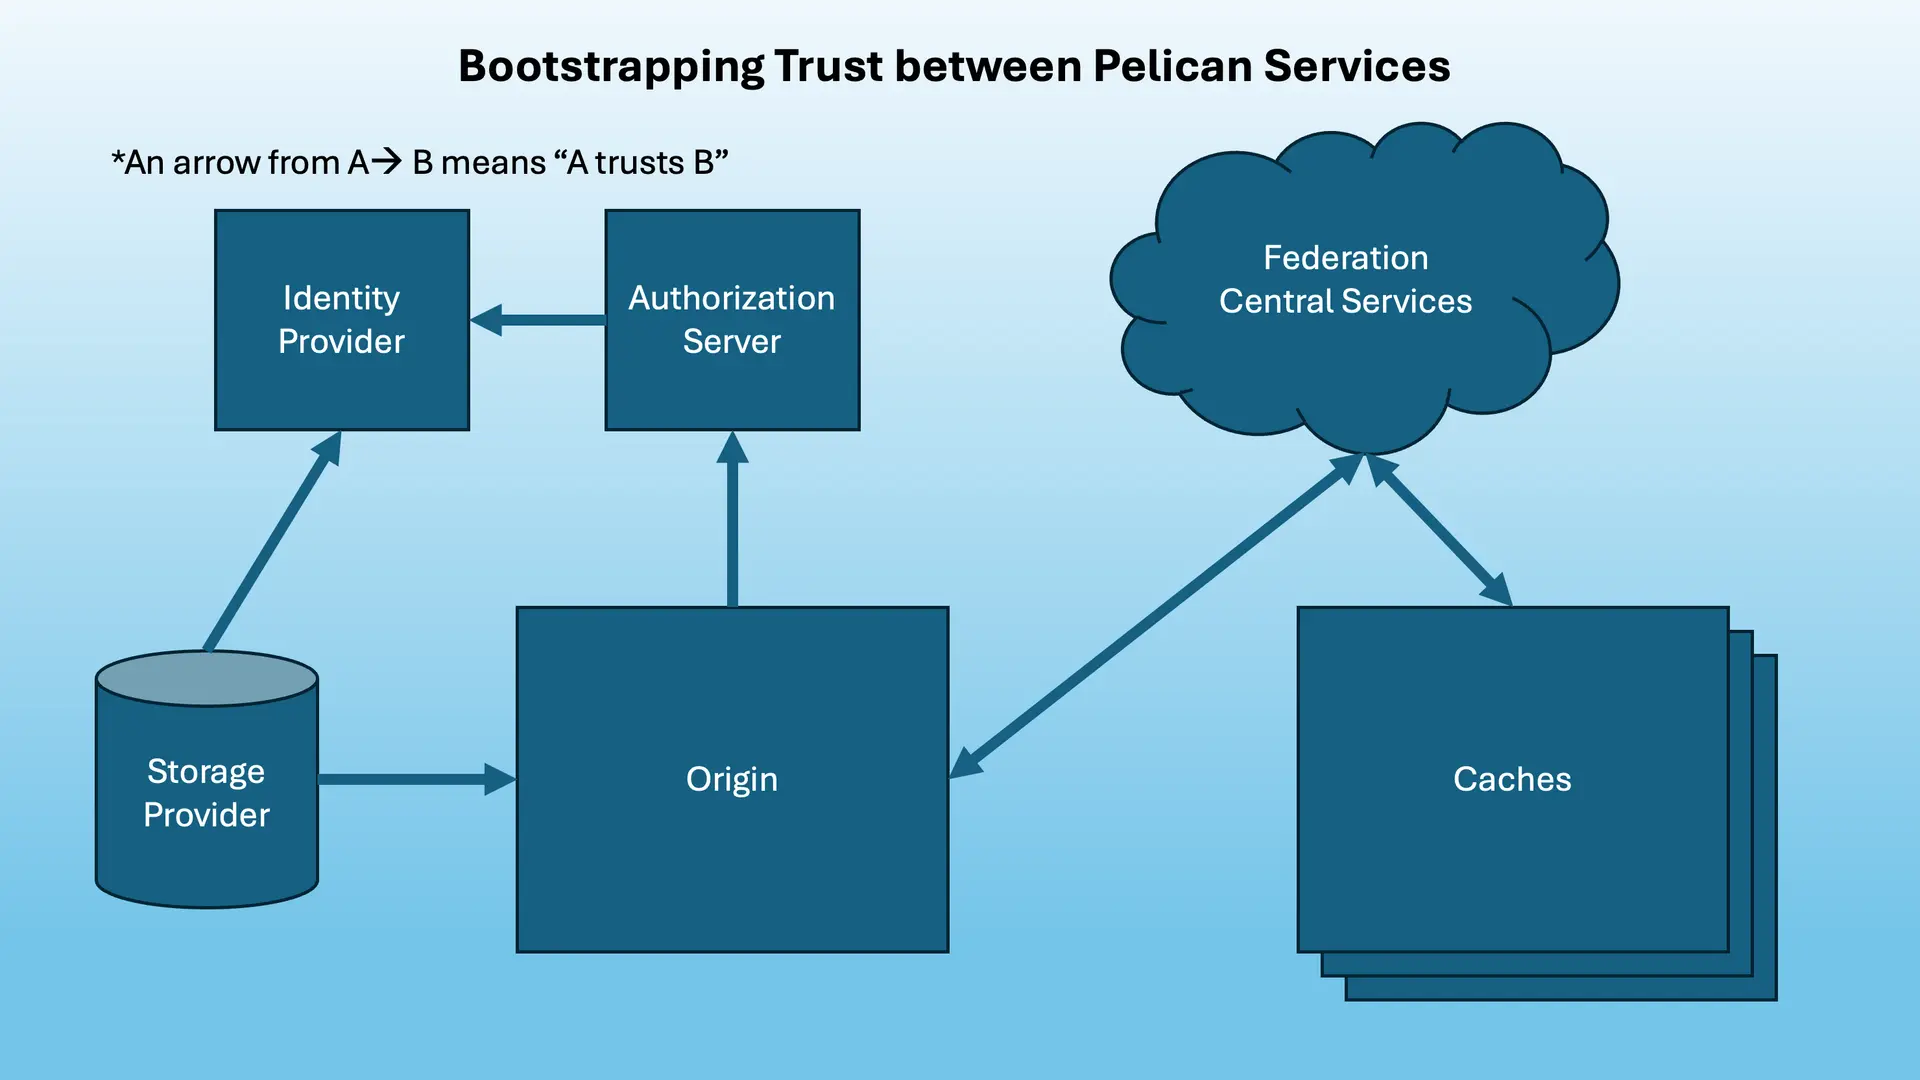
Because this process involves stringing together multiple services, it’s worth taking a moment to analyze how trust is bootstrapped between each of them.
-
The Storage Provider Trusts the Origin and the Identity Provider: The entire chain of trust starts with the owner of some underlying storage trusting the Origin to enforce whatever access policies it provides. Crucially, because the Storage Provider defines the policies that map a user’s identity to their permissions (e.g. “Bob can read /foo”), they must fundamentally trust the Identity Provider to accurately verify that identity. If the Identity Provider cannot be trusted to say “This is Bob”, nobody can safely grant “Bob” access.
-
The Authorization Server Trusts the Identity Provider: When users authenticate with the Identity Provider, the authorization server trusts the identifiers it is handed. This trust is typically established when the authorization server is registered as a client with the Identity Provider. The authorization server trusts that the Identity Provider has rigorously verified the user’s credentials (password, MFA) before asserting their identity and attributes.
-
Origins Trust their Authorization Servers and Federation Central Services (Director/Registry): The Origin is explicitly configured with which authorization servers it trusts for which namespaces. This is done by providing an issuer URL for each namespace in the Origin’s exports; Pelican uses OIDC discovery on these URLs to fetch the public keys needed to verify tokens. The Origin trusts that if a token bears the signature of a trusted authorization server, the permissions inside that token are valid. Furthermore, Origins send information about their namespaces and their issuers to the Federation’s Director, which the Origin also trusts.
-
The Director/Registry Can Verify Origins/Caches: When Origins and Caches join a federation, they register their identities with the Registry and provide a public key corresponding to a private key they possess. Origins/Caches advertise who they are and what they do to the Director service, which uses the Registry to verify their identities. The Director can hand out the information in these advertisements, and anyone who’s part of the federation trusts the information because they trust the Director. Because Origins trust Central Services and Central Services trust Caches, Origins transitively trust that Caches will respect their access policies.
-
Caches Trust the Director/Registry: Because Caches can grant access to copies of namespaced data, they must know which authorization servers are trusted for which namespaces. Each Origin/namespace and their issuers are advertised to the Director by the Origin. Because both the Cache and the Origin trust the Director, the Cache trusts each namespace authorization server it learns about via the Director.
By chaining these trust relationships together transitively, we create a system where a Cache can serve an object to a user without ever knowing who the user is or directly contacting the user’s home institution.
Anatomy of an Origin’s/Cache’s Authorization Configuration
While a Pelican Origin or Cache is typically referred to as a single entity, it’s actually made up of two separate processes. The first is the Pelican process that manages everything else going on in the server, including handling server configuration, interacting with federations, and registering namespaces. The second is an XRootD process that actually hands out data, receives data access tokens and decides whether the token is sufficient to permit the request. This is why Origins and Caches are typically associated with two separate ports; each process binds to its own port.
XRootD manages data access authorization using two frameworks, the “Authorization Database File” (often abbreviated as “authfile”) and the XRootD-Scitokens plugin .
Note that SciTokens plugin works with multiple token formats (WLCG, SciTokens).
When Origins/Caches start up, they parse the policies provided in their configuration (Origins) or discovered via the Director (Caches) to generate configuration files for both of these frameworks. Because Caches usually serve multiple federation namespaces, a Cache’s authfile/SciTokens configuration is a union over the policies of the federation’s namespaces as presented by Origins.
Additionally, these generated configuration files may be merged with admin-supplied files by specifying the Xrootd.Authfile and Xrootd.ScitokensConfig config parameters.
However, any extra information provided in custom authfile or SciTokens configuration does not propagate through the rest of the federation and improper configuration can result in unintentional data exposure. Use these at your own risk!
If you’re setting up an Origin to serve protected data and you can use tokens to download directly via the Origin but not via Caches, double check that you’re not relying on admin-supplied authfile/SciTokens configuration!
Whenever an Origin/Cache receives a request, it first consults the SciTokens configuration and then falls back to the authfile if access cannot be granted via the SciTokens plugin.
SciTokens Configuration File
The SciTokens config file’s basic contents include a list of Issuer URLs along with which namespaces (base paths) those Issuers should be used for.
Below is a sample of a generated Origin SciTokens configuration:
#
# Copyright (C) 2024, Pelican Project, Morgridge Institute for Research
#
# Licensed under the Apache License, Version 2.0 (the "License"); you
# may not use this file except in compliance with the License.  You may
# obtain a copy of the License at
#
#    http://www.apache.org/licenses/LICENSE-2.0
#
# Unless required by applicable law or agreed to in writing, software
# distributed under the License is distributed on an "AS IS" BASIS,
# WITHOUT WARRANTIES OR CONDITIONS OF ANY KIND, either express or implied.
# See the License for the specific language governing permissions and
# limitations under the License.
#

#
# This is a generated configuration file -- DO NOT HAND EDIT.
# It will be overwritten on the next startup of pelican.
#

[Global]
audience_json = ["https://my-origin.com:8443"]

[Issuer Origin https://my-origin:8440 and Built-in Monitoring]
issuer = https://my-origin:8440
base_path = /my-namespace, /pelican/monitoring

[Issuer Federation-based Monitoring]
issuer = https://osg-htc.org
base_path = /pelican/monitoring
default_user = xrootd

# End of config
For more information about XRootD’s SciTokens plugin configuration, see https://github.com/xrootd/xrootd/tree/master/src/XrdSciTokens .
Authfile Configuration
Each line in an authfile at Origins/Caches maps some kind of identifier to a list of path:privilege pairs.
While admin-supplied authfiles can be quite complicated, a Pelican-generated authfile that hasn’t been merged with anything will only use the l (list) and r (read) privileges for a given path.
A - is used before each set of privileges to subtract those privileges, while the absence of a - means the privileges are granted.
Pelican-generated authfiles are never used to grant write privileges — this is always done via the SciTokens configuration.
Below is a sample of a generated Origin authfile configuration:
u * /my-prefix-auth -lr /.well-known lr /my-prefix lrThis authfile allows any user to list/read the contents of the /my-prefix namespace with /my-prefix lr, but prevents all users from listing/reading the contents of /my-prefix-auth with /my-prefix/auth -lr.
The /.well-known path for the Origin’s public keys is also exposed via XRootD.
It is very important to get the ordering of each authfile line and each privilege in a line correct.
XRootD’s authorization library parses top to bottom, left to right and uses basic string matching to determine access privileges.
The following authline is incorrect because /my-prefix-auth will match the policy for /my-prefix before the /my-prefix-auth policy is checked, accidentally granting privileges:
u * /my-prefix lr /my-prefix-auth -lrFor more information about XRootD Authfiles, see https://xrootd.web.cern.ch/doc/dev56/sec_config.htm#_Toc119617472